Last updated on May 5th, 2024 at 02:24 pm
 I have long disliked my daughter’s big, bulky, white wardrobe. It’s from Ikea which I normally rave about but the white paint wasn’t put on thick enough so you can see the wood underneath which almost gives it a dirty look and it’s boring. I have contemplated painting it so many times but other things just get put on my to do list. You know how that goes as parents, right?
So when Pixers contacted me to see what I could design with their Pixerstick, I immediately thought of my daughter’s wardrobe and add a little interior personalization to it. Her new bedroom makeover that we did for her birthday is vibrant, bright, and fun so I wanted to keep the same look for her wardrobe.
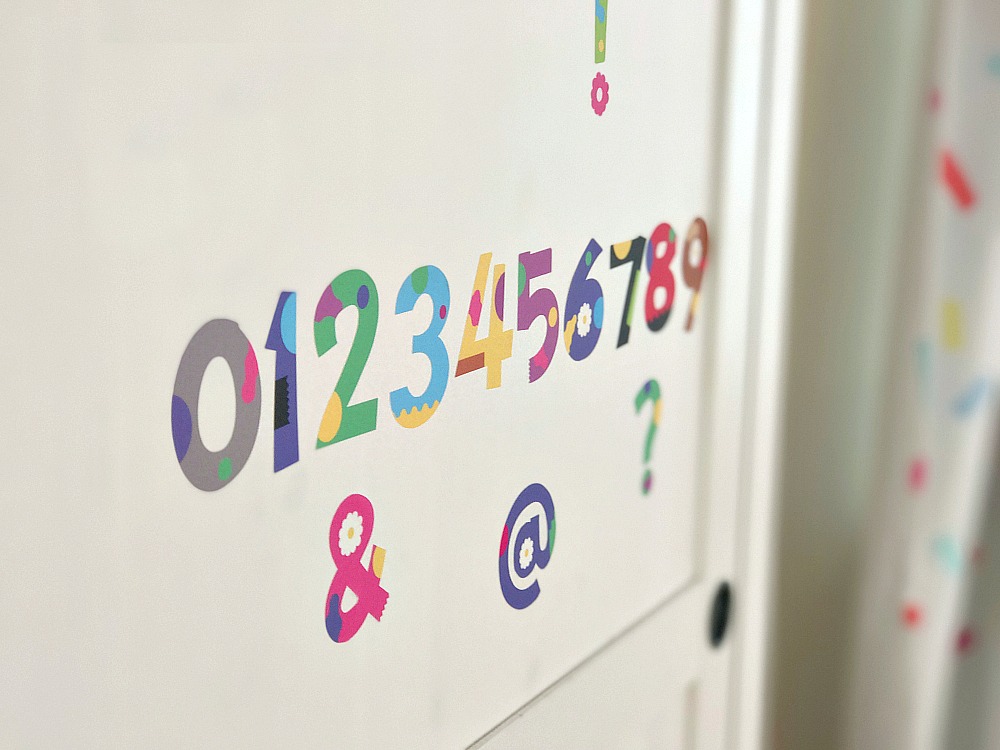
Having only ever used her name as a wall decal that literally almost caused a divorce putting it up above her bed I was a little nervous for the ones, I chose for her wardrobe. It’s has four squares, two on each door panel so I thought I would go with four separate designs. Designs I know she would love like birds, owls and butterflies and ones that she could also learn from like ABCs and 123s. It worked out a dream.


You can see below how much it really matches her confetti curtains too. I love the bursting colors on the Pixerstick. I was worried when I chose them that they might come too pale or light colored but these fit perfectly with everything in her room. She has already names the big birdie, “tweety”. Says that she sings to her in her sleep. Oh, the things kids come up with, I love it.
It made me start to think where else in the house I could use some Pixersticks. They quickly revamp a room or piece of furniture in seconds. This literally took me five minutes to put on all four squares. I was really impressed. From kids bedrooms to the living rooms, they have patterns and designs to suit any room and any furniture.

Not only was it so easy to peel off the white sheet it came on but so easy to apply too. I thought I was going to have to measure out straight lines and get it just right for EVERY letter and number. Not only did I not have to wasting time doing that but if one was a little sideways I could peel it off the closet and reapply and it didn’t lose it’s stick.
I couldn’t wait to surprise MM with her new wardrobe makeover. She was over the moon with it. She now says all her numbers and letters in her bed before going to sleep which is cute as her bed faces the wardrobe. Its become something we do together and it’s good for her to practice as she is starting school next September. I also think it spices up her wardrobe and makes it tie in with her colorful bedroom theme. What a transformation!

Have you ever used wall decals or in this case Pixersticks? Perhaps in the nursery when you decorated for your baby? Or maybe somewhere else in the house? I never knew you could use them on furniture like I did here. It’s such a great idea. Transforming plain, boring pieces of furniture to fun and lovely furniture. I would definitely recommend them and they have thousands of patterns, designs, ideas, trust me you will be at lost for words on choice.

*I was sent these Pixerstick aka wall decals to test out but all opinions are my own.


